

3DS MAX
FREE AUTODESK SOFTWARE FOR STUDENTS
ITE has an agreement with Autodesk to provide free softwares for our students.
Sign up for an account and begin downloading.
http://students.autodesk.com/
Click [Communities] [ Students and Educators]
Sign up as an ITE student.
Download 3DS Max Design 2014.
Depending on your network seed and processor/harddisk speed, downloading and installation may take up to 1 hour 40 mins. For use of software without much rendering, a quad-core i3 processor with 4GB ram is recommended as minimum.
For rendering of animation up to a few hours (quite normal) a quad-core i7 with 8GB ram is recommended.
Above that, a workstation is recommended. Beware that if your hardware cannot take the rendering, it may go kaput!!
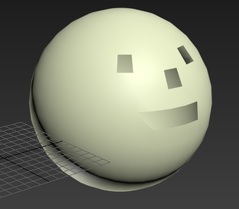
Can you create this ?
3D VIDEO TUTORIALS - sECTION A TO SECTION D
Section A
You need to pick up the basics of using this software and get used to the many icons and settings. Be patient and keep practising. Memorise steps that you use often.
Once you have skills using the basics, you can go on to create your own imagined objects.
Tutorial A1 - Introduction
Tutorial A2 - Introduction to vertex, edge, poly, extrude, weld, inset, bevel. (very good)
Tutorial A3 - The Viewport; 4 different views of what you are creating.
At different times, you need to use a different view.
Use hold-wheel to pan.
Shift-roll to zoom
Tutorial A4 - Views, Viewports, Reset, New File, Zoom, and Merging multiple files.
(To merge - import, merge)
Tutorial A5 - Creating Basic Objects; take note of the Create icon.
Take note of segments, vertex, polys - important basics
Tutorial A6 - Drawing a flower vase using outline, lathe modifier.
Tutorial A7 - Binding Objects
Tutorial A8 - Advanced Selections
(Object Selection, Group Selection, Selection Lock Toggle, Pre-set Selection)
Tutorial A9 - Hide, Freeze, Layers
(Hide objects, Freeze objects, Create manage layers)
Tutorial A10 - Cloning and Arrays
(No paste, only clone; same keystroke Ctrl-V;
Clone-copy - new object created
Clone-instance - new object linked to original; editing affect both)
Arrays - copy many of one object; choose axis; choose incremental (spacing between copied objects)
Tutorial A11 Grouping and Linking
Group/Ungroup
Group Open/Close - allow individual object editing
Group Attach - add object to existing group
Click Link icon, drag object (child) to another (parent)
When parent obj moved, child follows; when child obj moved, parent does not follow
Use Unlink icon to unlink
Parent can have more than one child; to see all, unselect all obj and hit letter H.
Tutorial A12 - Editable Mesh, Sub objects
Normal objects created are known as parametric objects; they must be converted to editable mesh for editing.
Select objoct, R-click, Convert to Editable Mesh
Sub-objects refer to Vertex, Edge, Face, Polygon, Element
Choose one sub-obj, then edit any point on the editable mesh.
Select Soft Selection and choose a number for edge distance (this specifies the number of points to be affected by editing)
Tutorial A13 - Modifiers for editable mesh
Actions such as bending an object.
Choose from modifier list after converting to editable mesh.
Tutorial A14 - Shapes, Splines, Modifiers
[Create] [Shapes] - create 2D objects (line, rectangle, text, et)
Right-click on it to [Convert to Spline] for editing, such as bend a line, add vertex, etc.
There are 3 icons in red for you to choose for editing.
After editing the 2D shape, use Modifier Extrude (increase value for extrusion) to change it to 3D.
This method offers control over the shapes of objects - [Create] [Object] at the right panel does not give you much control over the 2D shapes.
Tutorial A15 - Splines - Modifiers Extrude, Lathe
Turn 2D into 3D
Tutorial A16 - Editable Polygons
A shape or object is made up of faces known as polys - a poly is one face of an editable mesh
Ignore backfacing - edit only selected poly/points facing you
'W' brings up Move tool
Tutorial A17 - Using the Align Tool, used to align objects in line (X,Y and Z axes). Useful when you wish to align and cut a hole in an object, join objects, etc.
Tutorial A18 - Creating 3D Texts (Shapes-Text, Modifier Extrude)
Tutorial A19 - Creating a Garment (Modifier Garment Maker)
Note : To use an image as a guide, load it as Viewport Background
([Create], [Viewport Background] , select image from harddisk)
|
Tutorial 9
Orange created using textures
|

|
Section B
Tutorial B1 - Drawing a complete apartment
Tutorial B2 - Drawing a Roof
Material and Maps
Add your photos to an object
You can add your own images to the surface of an object.
Material Editor; bring up using letter 'M'.
Steps : Create object, Material Editor, Diffuse (select image from harddrive), drag to surface, click [View in Standard viewports).
Change the value of 'Opacity' to make the object transparent.
Change the values of the 'Specular Highlights' parameter to make object shine.
Tutorial B3 - Materials
Another good video on this.
Exercise - add your photo a a teapot
Tutorial B4 - Material and Maps; Maps add more effects to materials; they go together.
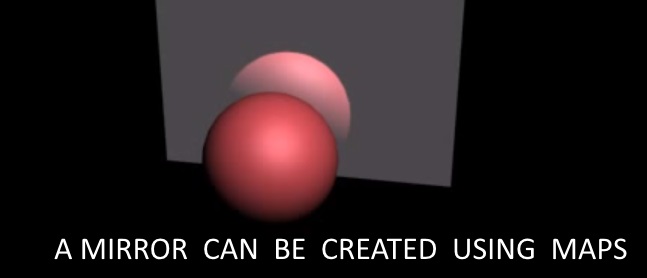
To create a mirror:
Create a Plane, rotate it vertical
1. Bring up Materials Editor, Select Material
2. Material Type : Standard
3. Click [Maps]
4. Check [Reflection],
5. Click [None] button
6. Select [Flat Mirror] or [Reflect/Refract] depending on version
7. Click [okay]
(Back at the material screen)
8. Uncheck [Apply Blur]
9. Uncheck [Environment Map]
10. Check [Apply to Faces] (ignore if cannot find this option)
11. Drag Material to object (in this case, the plane)
12. Create a sphere, place it in front of the mirror
13. Hit [F9] to render and see the effects.
(You can use this mirror as the screen of a monitor)
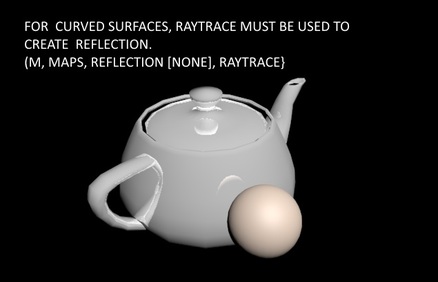
To add glossy look to object:
1. 'M' to open Materials Editor
2. Select empty material
3. Material type: Arch & Design
4. Template from the drop-down list: Translucent Plastic Film, Light
5. Color: bright red (R0,9 G0,0 B0,0)
6. Transparency: 0.6
7. Glossiness: 0.6
8. Glossy Samples: about 32
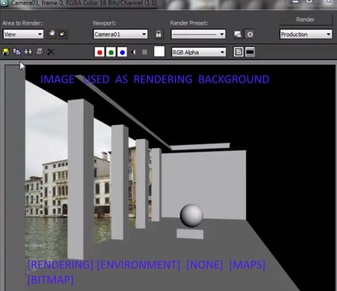
Tip - To change background color of rendered scene, click [Rendering] [Environment] and select color. Else, click [None] [Maps] [Bitmap] and select an image to use as background.
Tutorial B5 - Applying Maps (at the Material Editor)
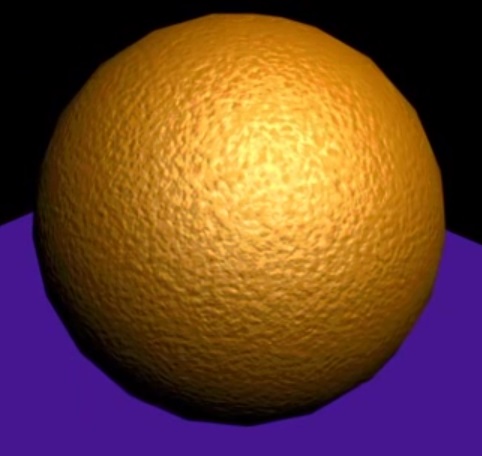
Tutorial B6 - Bumps; use bumps and materials to create texture on a surface, such as an orange sphere with added texture to look like an orange.
Tutorial B7 - Compound Materials; adding more than one material on one object.
Tutorial B8 - Creating balloons - very good!!
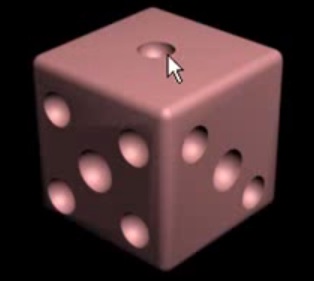
Tutorial B9 - Create a dice; chamfer box, sphere, Compound Objects - Boolean,
Compound objects - Proboolean (for multiple objects)
Tutorial B10 - Create a lamp, using Viewport Background as guide; Lathe modifier.
Tutorial B11 - Creating an orange
(Note : for drawings of apartments, go to youtube.com and search 'bunnyboxx'.
Tutorial B12 - Create your own Material Library
Tutorial B13 - Create Laminate Floor
Tutorial B14 - Create a sofa - good
Tutorial B15 - Create a Pillow
Tutorial B16 - Creating Teeth
Tutorial B17 - Create a football
Tutorial B18 - Create realistic grass. Use plane, modifier-hair-fur.
Tutorial B19 - NURBS Curves ; use these curves to create complex shapes
Tutorial B20 - Compound Objects/Scatter (many object2 placed on object1)
Tutorial B1 - Drawing a complete apartment
Tutorial B2 - Drawing a Roof
Material and Maps
Add your photos to an object
You can add your own images to the surface of an object.
Material Editor; bring up using letter 'M'.
Steps : Create object, Material Editor, Diffuse (select image from harddrive), drag to surface, click [View in Standard viewports).
Change the value of 'Opacity' to make the object transparent.
Change the values of the 'Specular Highlights' parameter to make object shine.
Tutorial B3 - Materials
Another good video on this.
Exercise - add your photo a a teapot
Tutorial B4 - Material and Maps; Maps add more effects to materials; they go together.
To create a mirror:
Create a Plane, rotate it vertical
1. Bring up Materials Editor, Select Material
2. Material Type : Standard
3. Click [Maps]
4. Check [Reflection],
5. Click [None] button
6. Select [Flat Mirror] or [Reflect/Refract] depending on version
7. Click [okay]
(Back at the material screen)
8. Uncheck [Apply Blur]
9. Uncheck [Environment Map]
10. Check [Apply to Faces] (ignore if cannot find this option)
11. Drag Material to object (in this case, the plane)
12. Create a sphere, place it in front of the mirror
13. Hit [F9] to render and see the effects.
(You can use this mirror as the screen of a monitor)
To add glossy look to object:
1. 'M' to open Materials Editor
2. Select empty material
3. Material type: Arch & Design
4. Template from the drop-down list: Translucent Plastic Film, Light
5. Color: bright red (R0,9 G0,0 B0,0)
6. Transparency: 0.6
7. Glossiness: 0.6
8. Glossy Samples: about 32
Tip - To change background color of rendered scene, click [Rendering] [Environment] and select color. Else, click [None] [Maps] [Bitmap] and select an image to use as background.
Tutorial B5 - Applying Maps (at the Material Editor)
Tutorial B6 - Bumps; use bumps and materials to create texture on a surface, such as an orange sphere with added texture to look like an orange.
Tutorial B7 - Compound Materials; adding more than one material on one object.
Tutorial B8 - Creating balloons - very good!!
Tutorial B9 - Create a dice; chamfer box, sphere, Compound Objects - Boolean,
Compound objects - Proboolean (for multiple objects)
Tutorial B10 - Create a lamp, using Viewport Background as guide; Lathe modifier.
Tutorial B11 - Creating an orange
(Note : for drawings of apartments, go to youtube.com and search 'bunnyboxx'.
Tutorial B12 - Create your own Material Library
Tutorial B13 - Create Laminate Floor
Tutorial B14 - Create a sofa - good
Tutorial B15 - Create a Pillow
Tutorial B16 - Creating Teeth
Tutorial B17 - Create a football
Tutorial B18 - Create realistic grass. Use plane, modifier-hair-fur.
Tutorial B19 - NURBS Curves ; use these curves to create complex shapes
Tutorial B20 - Compound Objects/Scatter (many object2 placed on object1)

Section C - Intermediate
Tutorial C1 - Cameras; cameras can be added for creating animation.
Tutorial C2 - Lights; lights can be added and placed in different positions to create shadows.
Tutorial C3 - Drawing a cartoon car
Tutorial C4 - Extruding a Floorplan (drawing a building given a Autocad floorplan)
Tutorial C5 - Adding doors to a wall
Tutorial C6 - Adding windows to a wall
Tutorial C7 - Adding stairs
Section D - Animation
A very powerful PC (Intel i7 chip, 16GB RAM, 8GB graphics card) is needed for this. The PCs in our labs are not powerful enough to handle long animations. Limit yours to 1 minute or less; processing will take a while for animation to play.
Tutorial D1 - Animation
Tutorial D2 - Using Trajectories
Tutorial D3 - Animation
Tutorial D4 - Text Animation using Proboolean
Tutorial D5 - (advanced) Explosion using Particle System
Tutorial D6 - create water;
Use plane, Modifier Noise, material (Standard, Promaterials water; adjust waveheight;
drag to plane)
[Create] [ Daylight][Yes]....
TUTORIALS IN PDF (MANY FILES, GOOD REFERENCE)
Click here.
Click here.
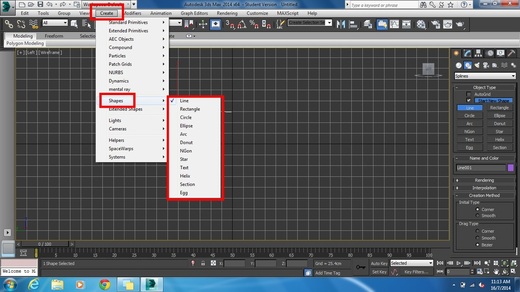
CREATE - SHAPES
There are other objects here, including texts.
There are other objects here, including texts.
